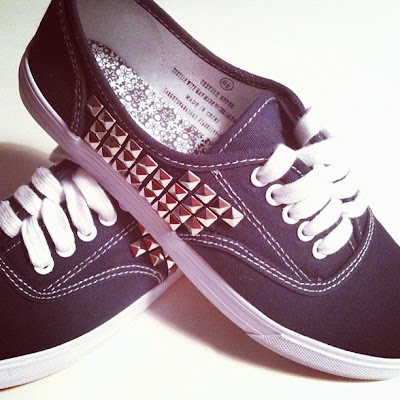
I've had this desire for a while to create my own studded shoes. The initial inspiration came from Honestly WTF's tutorial. While the pictures shown in that tutorial were of light blue and pink Vans with gold studs, I opted for a much cheaper choice, since this was my first time trying it and frankly I just like cheap stuff! :)
- First you'll need to get yourself a pair of sneakers, unless you have an old pair laying around that you want to use. I got my navy blue tennis shoes at Target for $12.99 (!). They also come in white, so if I decide I want another pair of these, I might end up going back and getting the white pair and just dyeing them! I wasn't up for paying 40 or 50 or 60 dollars for Vans, so these were the perfect replacement :)
- Secondly, you'll need some studs. The studs I got were super cheap. On almost all of the tutorials I found, they gave links to online stores that sold studs. Most of these places that I checked out per the advice of these tutorials sold the studs for like $30 for 100 studs! So glad I decided to check eBay; I got 200 of them for $2.45 with free shipping! You can check those out here if you'd like. They come in all different shapes and sizes; I chose the 7mm pyramid style. The only thing about these studs is that they do have prongs that push through the fabric. If you don't want to pierce holes in your shoes, you may opt for flat-back studs, as the tutorial above did, and glue them to the shoes.
- Tweezers are also a good thing to have, I found, to set the studs exactly where you want them. Maybe it's just me, but I was fumbling with them a bit and couldn't get them where I wanted them. So tweezers came in handy. They also helped in pushing down the little prongs of the studs on the insides of the shoes.
I took the laces out of my shoes, as you can see, to give myself easier access to the inside of them. Not a bad idea.
Start by lining your studs up along the bottom edge of the shoe (to give you a straight guideline all the way up), and determine how many you can fit. Do this BEFORE you start poking any through the canvas. You can see a little bit on the right side above that I misjudged my spacing, and the right side ended up being more spread out than the left side, where I tried to cram them all in.
Once you've figured out how you're going to arrange your studs, start poking them through the canvas one by one, and push the prongs inward to secure the studs, and so you won't feel them when you wear your shoes.
Continue building upwards and fit the studs on however you like. I'm not sure exactly how I did it, but somewhere along the way I miscounted, and ended up with a different design on the right shoe than on the left. I think they still look good, but it would've been better if they matched exactly haha! Hopefully no one will notice...
Continue on with the second shoe, and you've got yourself a brand-spankin' new pair of shoes for less than $15, when you could've spent nearly $200 from Vans or Converse! Congratulations, and wear 'em well :)
If you guys have any questions, I'd be happy to answer. And if you decide to make yourself a pair, I'd love to see how they turn out! :)
Happy studding!


We liked your DIY so much, we featured it on Fashion DIYs! Credit given, of course.
ReplyDeletehttp://www.fashiondiys.com/2012/06/how-to-make-studly-sneakers.html
Wow, that's awesome, thank you! :)
ReplyDeletethe ebay link is a great tip, thanks!
ReplyDeleteNo problem, I'm glad you found it helpful! :)
Deletesimple to do, but such an impact! I am excited to do this one!! :)
ReplyDeleteIt really is simple! Thanks Kate, hope they turn out well! :)
DeleteAfter wearing them don't the backs open up and irritate your feet?
ReplyDeleteNope, if you push the prongs in enough you won't feel them at all. I still wear mine and have never had a problem!
DeleteGreat result! Like the work you've done on these, and your design :)
ReplyDeleteI studded my handbag and top, please have a look at: http://whatscraftdoc.blogspot.co.uk/2013/04/diy-stud-stud-stud-handbag-and-top.html
I love how creative this DIY project is!
ReplyDelete