Saturday, June 30, 2012

Rock On Concert Nails

Super quick post, since I'm about to leave for a concert (Andy Grammer & Gavin DeGraw!) with my sisters and mom! :) Sorry that I don't even have time to post a tutorial, but I just whipped these up and thought I'd share.


For these, all I did was use a sparkly silver polish (a cheap American Eagle polish from the Christmas season...took three coats to get it to be opaque!), and then let it dry. Once those dried, I masked off a line from the bottom corner of my nail up to around where the curve started; I used blue painter's tape and it worked great! Then I used this 3D glitter polish, Nails Inc. Special Effects in "Sloane Square" from Sephora, and painted the tips up to the painter's tape. After about a minute, I peeled off the tape, and got this cool look! I put a clear topcoat over it, and they look fabulous, if I do say so myself :)

Gotta run, though! Feel free to comment, share, etc. But please always link back!

xo

--

Update: back from the concert and other festivities of the night! SO awesome. Definitely relived my childhood through Gavin DeGraw haha, especially when he sang "I Don't Wanna Be"--I got so pumped! Andy Grammer decided during his concert to run around the whole auditorium, and he for some reason squeezed through our row (mind you there was about a 12" space between me and the seat in front of me, so he really had to squeeze!) and my sister and I both grabbed his arm as he walked by, and he danced with my aunt! Too darn funny. After the concert we got Gavin DeGraw (who's one of my sister's favorites) to sign my sister's hat and my ticket stub, and he was so sweet! We had to work pretty hard to get autographs, but it was worth the wait :) All in all, an awesome night!

Monday, June 25, 2012

DIY Studded Cutoff Jean Shorts

I can never ever find shorts that fit me new from the store. I don't know what it is: some shorts are made for girls without butts, some fit perfectly in the butt but squeeze my legs like there's no tomorrow, and some I can't even get past my thighs until I go up a few sizes, and then they're way too big on my waist. Either way, for the past few years I've started just making old jeans into shorts. I decided a few weeks ago that I was getting tired of my old shorts and needed a new pair, so I made these!

First I went to Goodwill to find an old worn-in pair of jeans specifically for this purpose. I wasn't about to buy a $40 pair of jeans just to cut 50% of them off, and I didn't have any jeans I was willing to cut up at the time either. So I found this pair for $4.50 or so (I believe they're all around the same price), and thought they'd be perfect!


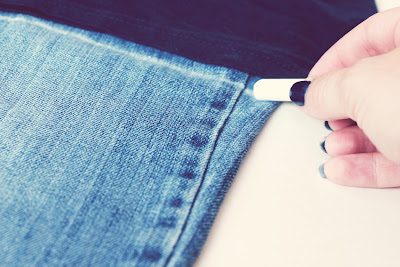
The first thing I do to make shorts out of jeans is take another pair of shorts that I like the length of, and trace the legs of the shorts on the jeans with the crotches matched up. I just used an old pair of Soffee shorts (love those!) and traced a line across the edge with a bit of chalk (so it'll wash off easily). If you want the shorts to be the same length as your other ones in the front and back, make sure you fit the example shorts accordingly--so when you're drawing a line for the front of your denim, trace the front of the shorts, and when you're tracing on the back, use the back of the shorts. Trust me, they are probably different (longer in the back, usually).


Cut a few inches below the chalk line. This will make it so you can try on your shorts and decide if the line is good, or if it needs to be raised/lowered. You can also see if you'd like to hem the shorts, or keep a rough edge so they fray. I chose to let mine fray.


Sew with matching (or close) thread along the final chalk line. This will make it so your shorts can still fray, but they won't keep fraying and getting shorter with every single wash. So wherever you put the stitches is where your shorts will stop fraying.


Cut off the excess fabric, leaving a little space below the thread. I left about a centimeter, because I wasn't sure how much they'd fray on the first wash.


Throw the shorts in the washer (especially if you get them from Goodwill or a thrift store like I did), and if you're not worried about shrinkage, you can put them in the dryer, too. I personally don't ever put my denim in the dryer, unless I'm really in a rush, so I let these air dry.


Your shorts will fray more with a few washes, so don't be discouraged if they don't look exactly how you want after the first wash.


I also wanted to add a little more flair to these since I have 3 or 4 similar pairs, so I added some small studs that I had left over from my studded shoes tutorial that I didn't know what to do with. I've worn my shorts a few times already and I love them! Hope this was helpful, and if you have any questions, don't hesitate to ask!

Tuesday, June 19, 2012

Shoesday Tuesday! Stud 'em up.


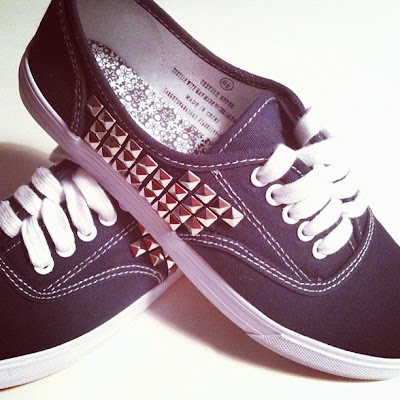
I've had this desire for a while to create my own studded shoes. The initial inspiration came from Honestly WTF's tutorial. While the pictures shown in that tutorial were of light blue and pink Vans with gold studs, I opted for a much cheaper choice, since this was my first time trying it and frankly I just like cheap stuff! :)

  • First you'll need to get yourself a pair of sneakers, unless you have an old pair laying around that you want to use. I got my navy blue tennis shoes at Target for $12.99 (!). They also come in white, so if I decide I want another pair of these, I might end up going back and getting the white pair and just dyeing them! I wasn't up for paying 40 or 50 or 60 dollars for Vans, so these were the perfect replacement :)
  • Secondly, you'll need some studs. The studs I got were super cheap. On almost all of the tutorials I found, they gave links to online stores that sold studs. Most of these places that I checked out per the advice of these tutorials sold the studs for like $30 for 100 studs! So glad I decided to check eBay; I got 200 of them for $2.45 with free shipping! You can check those out here if you'd like. They come in all different shapes and sizes; I chose the 7mm pyramid style. The only thing about these studs is that they do have prongs that push through the fabric. If you don't want to pierce holes in your shoes, you may opt for flat-back studs, as the tutorial above did, and glue them to the shoes.
  • Tweezers are also a good thing to have, I found, to set the studs exactly where you want them. Maybe it's just me, but I was fumbling with them a bit and couldn't get them where I wanted them. So tweezers came in handy. They also helped in pushing down the little prongs of the studs on the insides of the shoes.


I took the laces out of my shoes, as you can see, to give myself easier access to the inside of them. Not a bad idea.


Start by lining your studs up along the bottom edge of the shoe (to give you a straight guideline all the way up), and determine how many you can fit. Do this BEFORE you start poking any through the canvas. You can see a little bit on the right side above that I misjudged my spacing, and the right side ended up being more spread out than the left side, where I tried to cram them all in.

Once you've figured out how you're going to arrange your studs, start poking them through the canvas one by one, and push the prongs inward to secure the studs, and so you won't feel them when you wear your shoes.


Continue building upwards and fit the studs on however you like. I'm not sure exactly how I did it, but somewhere along the way I miscounted, and ended up with a different design on the right shoe than on the left. I think they still look good, but it would've been better if they matched exactly haha! Hopefully no one will notice...

Continue on with the second shoe, and you've got yourself a brand-spankin' new pair of shoes for less than $15, when you could've spent nearly $200 from Vans or Converse! Congratulations, and wear 'em well :)


If you guys have any questions, I'd be happy to answer. And if you decide to make yourself a pair, I'd love to see how they turn out! :)

Happy studding!


Friday, June 15, 2012

The Two-Minute Bracelet


I had a few different inspirations for this bracelet recently. The first inspiration comes from a brand called Dogeared. They have a collection called "Karma Jewelry," which features very simple necklaces and bracelets with a circle charm on them. There was a cute quote with them that I liked:

what goes around, comes around... wear your necklace as a reminder to keep the circle positive, peaceful and loving...

I thought these were so cool, but for $56, I wasn't feelin' it. I also don't wear necklaces all that often, so I wondered if I could do something similar but in bracelet form. Then I saw Happy Hour Projects' tutorial for these adorable and incredibly easy bracelets on craftgawker. So I found a ring that I never wear, got some embroidery floss out of my stash, and whipped this up in less than 5 minutes! And I love it :)

Wednesday, June 13, 2012

DIY iPhone Case Art


If you're like me, you get bored of your iPhone case way too quickly. I spend so much time on Etsy and Amazon and eBay looking at iPhone cases that are relatively inexpensive, but a lot of the time they don't offer any coverage/protection for my phone. I'm pretty clumsy, so I didn't want to just get a bumper or something that won't protect my phone if I happen to drop it. I've had my Speck case for 6 months (it's super boring in my opinion, just plain white and gray) and it's offered a lot of protection to my phone, but I'm just sick of it.

SO. My solution: buy a clear case and make my own designs! After searching for a decently priced clear case (I did my research to make sure whatever I spent money on would actually offer protection...I ended up buying this one from eBay), I realized that people had already come up with this idea, and had made some really cute case art! I started to search around for templates, because I saw that idea quite a few times (I honestly was just planning on tracing my phone on some cute wrapping paper or something). I found this template from See That There's blog, downloaded it, and started working in Photoshop to create some cute covers! So I'm going to share that with you, in case you're not sure how to go about it.

First, you'll need to download the template above, or find your own. Open the file in Photoshop. Since I want to be able to use the template over and over again, I'm going to select the entire image (Ctrl+A), copy it (Ctrl+C), create & name a new file, and paste the material (Ctrl+V). I cropped out the stuff I didn't need, just because I'm OCD like that.


Next, use the Quick Selection tool to select the shape, and choose "Save Selection" (Select > Save Selection...).


Now for the next step, I designed my own quick little pattern. If you have a free pattern or something else you want to use (you could use a photo, anything), you can skip this step.

To create the pattern, I started off with a basic 1" x 1" canvas.


I just made a quick little blue triangle design. If you want to keep things symmetric and orderly, it helps to use guides (do this by turning on the Ruler view and dragging lines left/right from the vertical ruler and up/down from the horizontal ruler). To make my design I used the Polygonal Lasso tool to make triangles, and the Paint Bucket tool to fill them. You can make any design your little heart desires here! Here's my 1x1 square:


Next you'll need to define the pattern. Go to Edit > Define Pattern... and give your pattern a name, then select OK.


Now go back to your template and go to Edit > Fill > Contents > Pattern, and choose your newly created pattern. If nothing was selected, which is ideal for being able to choose exactly what parts of the pattern you want to show, then you should not see the iPhone outline anymore.
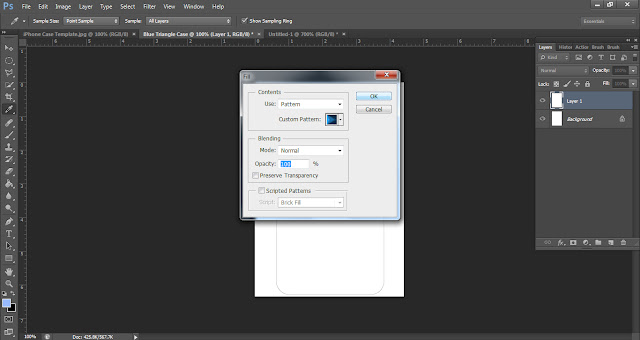


Once you've filled your pattern or photo or whatever you want, you'll need to load the selection you saved (Select > Load Selection...).


 I want the freedom to be able to choose exactly what part of my pattern will be showing, so I'm going to enter Quick Mask Mode (via the Quick Mask Mode icon on the toolbar, or Select > Edit in Quick Mask Mode) and use the Move tool to decide what you want to show.


When you get it just where you want it, exit Quick Mask mode by clicking the icon again or via the menu. Then you'll have a selection of the design--select the inverse and "cut" the extra pixels (Shift+Ctrl+I and then Ctrl+X, or use the menus).


Now you have iPhone art that's ready to be printed, cut out, and placed in your clear iPhone case!

I'm sure there are other ways of doing this, but this is just my method. Maybe later I'll come up with something quicker and easier. I'd love to see what you guys come up with if you'd like to post! And if you have any questions, feel free to comment!

Monday, June 11, 2012

First Mani Monday!

I'm obsessed with very few things in life. I hardly watch TV, so I'm not very up-to-date with celebrities or TV shows or anything. But a few of the things I would consider myself to be a little obsessed with would be music and doing my nails. I can't help myself! My nails just feel naked if there isn't anything on them.
So, for my first "Mani Monday," (not sure how many of these will actually fall on a Monday--I tend to do my nails once or twice a week, whenever I get bored or they start to chip) I'm going to show you how to make your basic French manicure a little more fun :)


First, make sure your nails are clean, and file them beforehand if you need. The first step is going to be the basic French manicure. For this, I used the Nailene French Tip pen. Works really well except for when it's running out haha! Keep in mind for this step that it doesn't have to be perfect, since you'll be covering up the edges with the glitter lines :) I'm usually OCD about how perfect my lines are, but not here. The fourth step also works a lot better if your white lines are straighter, rather than if you follow the natural curve of your nails. It'll make it easier to match the tape up with your lines.


Second, find some regular clear tape and take your glitter (or whatever color you choose) nail polish--I used  Nails Inc. Special Effects in "Sloane Square." Paint one or two coats directly on the tape and let it dry so that you can cut it into strips.


For the third step you're going to need some scissors. It's much easier to work with them if they aren't too big. Start cutting up little strips of the tape. The thickness depends on personal preference. You can also use this technique to create other designs to stick on your nails!


Next, set the tape strip right over the edge of the white tip. Try to get the most edge coverage without having to bend the twist the tape, otherwise you'll have tiny edges popping up that'll make the nail surface less smooth. Once you've got it where you want it, use small scissors or nail clippers to clip off the excess tape!


Voila! Now all you need to do is finish the rest of your fingers and add a clear top coat (or two) to make sure the glitter strip stays on. And you're good to go! :)

Wednesday, June 6, 2012

Testing, testing!

Not sure how long this blog will last, but I felt like it was about time I created one to share some of the projects I've been working on. YAY for DIY!